Saturday, May 9, 2009

Duo of Chocolate Custard shots


Literally shots.

Not because they're in these adorable micro mini Tic Tac Toe shooter glasses that are as big as my thumb, but because they're boozy. I was quite generous on the alcohol, so the custard refused to set properly, thus these alcohol-ish creamy chocolaty concoctions came to life.

Dark chocolate & Kahlua. White chocolate & Cointreau. Who said intentional accidents are bad?


Dark chocolate & Kahlua (or I like to say Dark MoKahlua... get it??? Fine... never mind....)
(my recipe is adapted from this one)
  • 2 cups skimmed milk
  • 4-6 oz 70% chocolate (depending on how intense you like it, I just basically poured in until I liked the taste)
  • 2 egg yolks
  • 1 whole egg
  • 3 tbsp corn starch
  • 2 tbsp butter
  • 1-3 tbsp Kahlua (I obviously put 4 or something... lol!!!!)

White chocolate & Cointreau

  • 2 cups skimmed milk
  • 3-4 oz white chocolate (you can put more if you like, but remember that white chocolate is very sweet, so taste as you go)
  • 2 egg yolks
  • 1 whole egg
  • 3 tbsp corn starch
  • 2 tbsp butter
  • 1-3 tbsp Cointreau

Use the same method for both


Over medium heat, melt chocolate in milk in a pot. In a bowl, whisk eggs & corn starch together well.

When the chocolate milk starts bubbling gently, slowly pour it into the egg mixture, in a thin stream while constantly whisking the egg mixture.

Pour everything back into the pot. Stir constantly until mixture thickens. Drop in the butter, continue to stir until it melts. Take it off the heat and stir in your alcohol. If you want to fill a tart shell, keep the alcohol at 1 tbsp. Cover with plastic wrap directly pressed onto the surface so it doesn't form a skin. Chill for a couple of hours before serving.


Cheers!!! XOX

Thursday, May 7, 2009

Stir fried pork & vermicelli


You know when you go to a Vietnamese restaurant, anywhere in North America, there will be a "Grilled chicken/pork/beef served with vermicelli/rice and salad and fish sauce" on the menu? Well this is the stir-fry version, for when you just have to have it NOW & got no patience for marinating meat.

Ok, this is not a recipe. Ready?
  • Meat: chicken/pork/beef/shrimp/tofu, whatever you have on hand. Grilled or stir fried, with a bit of oil, sliced onions & garlic, and a few drops of pure fish sauce right before taking it off the heat
  • Salad: iceberg lettuce/spring mix/romaine lettuce, bean sprouts, mints/Thai basil/coriander
  • Vermicelli, cooked and drained according to package
  • Sauce: prepared fish sauce
  • Chopped peanuts (optional)
  • Vietnamese "do chua" (pickled shredded carrots & daikon, optional)
  • Chopsticks (oh c'mon! You can't eat this with a fork!!! It's just not the same!)
Make sure your bowl is big, so when you mix everything together, nothing flies.


Hmmm... I looooove it.... And of course, I ate too much...
***sigh***

Wednesday, May 6, 2009

Dulce de leche Swirled Amaretto Frozen Yogurt


My waffle bowl found a friend.

It was my first time buying Balkan style yogurt, and I really liked it. The taste reminds me of the yogurt I used to eat in Vietnam. The tang tastes different than other full-fat yogurt sold in stores. There's no thick layer of yogurt breath on the tongue after you eat it. Or maybe it's just me...

Even though the 6% Balkan style yogurt is thick, I still drained it before making, and overnight, about 1-1.5 cup of liquid was collected.

Dulce de leche swirled Amaretto Frozen Yogurt
(by Tram)
  • 1 tub of vanilla Balkan style yogurt, 650g
  • 1-2 tbsp of amaretto cream (keep cold)
  • 2 tbsp of dulce de leche, or caramel, or a few caramel squares
Drained the yogurt overnight: line a big sieve with cheese cloth or 3 layers of paper towels, and hang it over a big bowl that holds everything. Make sure the bottom of the sieve doesn't touch the bowl. Put the yogurt in the lined sieve. Cover & keep in the fridge.

When ready, mix the amaretto into the yogurt & churn in your ice cream maker as according to the manufacturer's instruction.

Slightly warm the dulce de leche, or caramel in the microwave for 30 seconds. Or if you have caramel squares, you can melt them & let cool down a few minutes. When yogurt is done churning, layer drizzles of dulce de leche into the yogurt and store in the freezer.


Enjoy a scoop or 2, but I'm warning you, it's addictive!!!

Tuesday, May 5, 2009

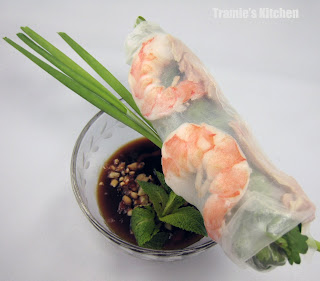
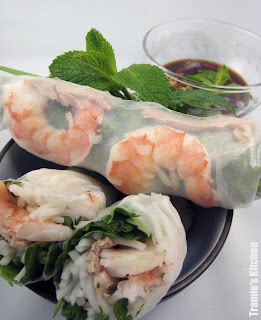
"Old school" spring rolls & the "real" sauce

When we were little kids in Vietnam, my cousin & I had quite a few eating habit that we would do together. One of our routines, was afternoon visits to the vendor around the corner. The lady sold fresh cut fruits, creme caramel, agar-agar jelly, "che" (Vietnamese rice pudding) freshly made "goi cuon" (spring rolls) "bi cuon" (pork rolls) and occasionally the man with his cart of "goi du du kho bo" (green papaya & beef jerky salad) was there too. Now that's what I call snacking!


My usual always included one spring roll no matter what else I ordered. It would come with a little bowl of sauce that is slightly sweet & salty, topped with a small bundle of "do chua" (pickled shredded carrots & daikon) then sprinkled with chopped peanuts.

THAT is the sauce that you're supposed to get with your spring rolls when you order in a Vietnamese restaurants, not the peanut sauce, which is Thai.


To make "old-school" spring rolls, you will need:
  • A big bowl of warm water to soak the rice paper.
  • Rice paper
  • Lettuce, washed
  • Mint leaves, washed & stemmed
  • Coriander, washed & stemmed
  • Asian Chives, washed (also called Garlic Chives, the part that has no flower bulbs)
  • Vermicelli, cooked as according to package, drained thoroughly.
  • Pork (optional, cooked & thinly sliced)
  • Shrimp (optional, cooked & split horizontally)
Dip the rice paper in the bowl of water half way through, and quickly turn it to moisten the whole thing. Shake off excess & immediately place on plate. After 30 seconds or so, when the water is evaporated, you can start rolling away. Make a roll-your-own spring roll party, your friends will love it.

To make THE sauce, here is my mom's recipe:
  • a dash of olive oil, or canola oil
  • a few cloves of garlic
  • 1/2 a small onion, sliced
  • Hoisin sauce (about 1-2 cups, depends on you)
  • a couple of spoons of water
  • Sriracha hot sauce (optional)
  • Vietnamese "do chua" (optional, you can buy them in Vietnamese food/sandwich stores)
  • crushed roasted peanuts
In a sauce pan, heat oil over medium heat, throw the garlic and onions in and stir around until fragrant & brown.

Put Hoisin sauce in.Heat through until it starts to bubble a bit. Put in some water and stir well to blend (Put more if you like your sauce more liquid) Take it off the heat & mix in Sriracha hot sauce if you want.


This is the "old school" version of Vietnamese spring rolls, but of course you can make them with whatever you like. Add julienned green mango, bell pepper, bean sprouts, cooked fish, chicken, or cooked strips of tofu. The sky is the limit!

Monday, May 4, 2009

Parmesan "Craffle" (Cracker Waffle)


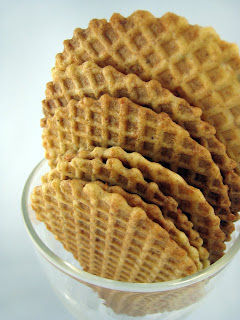
I'm on a roll with these crispy thin waffles. It's hard to stop when there are so many possibilities!

So here is the savory version that I came up with (after the Almond Mocha Bowls that Chic Cookies so kindly linked on her Edible Crafts blog. Thank you!!!)


Parmesan "Craffle"
(inspired by the recipe on the box of my Rival Waffle maker)
  • 3 eggs
  • 1/2 cup olive oil
  • 1 cup whole wheat flour
  • 1 tsp baking powder
  • 1/2 cup grated Parmesan cheese
  • 1 tsp sea salt
  • 1/2 tsp garlic powder
  • 1/2 tsp onion powder
  • 1/2 tsp dried basil
  • 1/2 tsp dried parsley
  • a couple of grinds of black pepper
Beat eggs& olive oil until well blended . Mix the rest of the ingredients together and slowly incorporate into the egg mixture while still beating. The mixture will be slightly thick.

Bake as according to your waffle cone) maker

***If you don't have a waffle (cone) maker:

Heat oven to 350F

Drop batter by 1 to 2 Tbsp full on a parchment-lined baking sheet, space them out between each other (Spread the batter slightly so the crackers wont be too thick, but don't do it too much because it will spread while baking too)

Bake for about 10 minutes or until golden brown. The best is to check up on them so they don't burn because all ovens are different.


Enjoy with your favorite dips & spread. Or just like that, one after another non-stop... Whaaaat??? It's not my fault they're yummy! :P